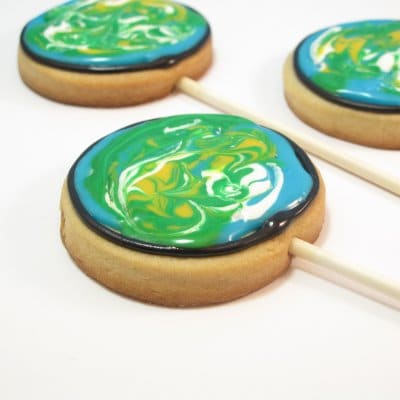
How to decorate Earth day cookies on a stick.
In honor of Earth Day, I made a consumable version… no waste! (Except for the stick, but there are plenty of ways to reuse lollipop sticks, and I’m sure you clever crafty people will find them.)
And for the record, I reuse “disposable” frosting bags til they fall apart in my hands.
So if you need something sweet to celebrate, try making these easy-to-decorate Earth Day cookies.
Be sure to check out the mini version of these, Earth Day cookie bites.
how to make earth day cookies
you will need:
cut-out cookie dough
royal icing
circle cookie cutter (I used 2 1/2″)
lollipop sticks (optional, no need to bake on sticks)
1 disposable frosting bag
1 coupler
1 size “3” decorating tip
rubberbands
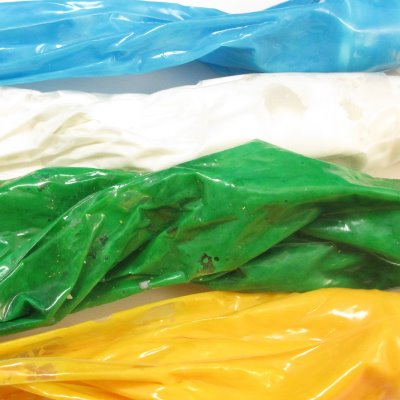
4 disposable frosting bags or ziploc bags
scissors
food colorings (blue, green, yellow, white and black)
toothpick
*Follow the link to find my dough and frosting recipes. Many of the above can be found at any major craft store. For tips on finding cookie decorating supplies, click here. For food coloring tips, click here.
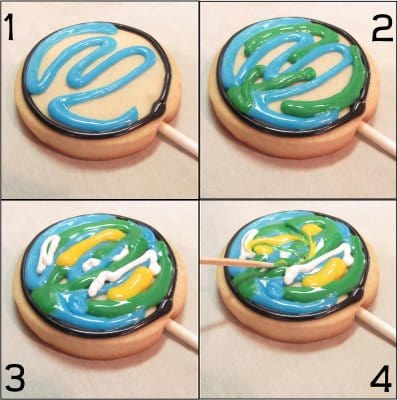
step one: bake your cookies on a stick
Follow the instructions in step one HERE for baking circle cookies on a stick. Let cool.
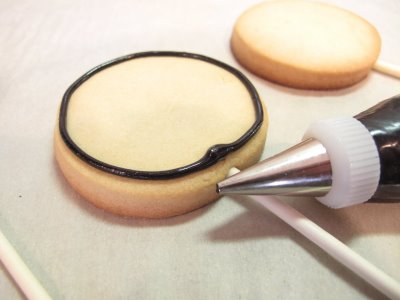
step two: outline your earth
Make frosting. (TIP: the frosting consistency shouldn’t be very runny, like flooding, but also shouldn’t be so stiff that you can’t swirl it in step three. In between is perfect.)
Mix about 1/2 cup of frosting with black food coloring.
Prepare a frosting bag with the coupler and size “3” tip. Fill with black frosting and tie closed with a rubber band. Outline the circle with black. Let set well, about 20 minutes.
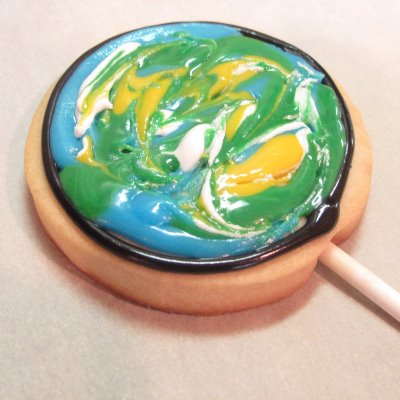
step three: fill your earth
Mix four colors of frosting (about 1/2 cup-3/4 cup each): blue, green, white and yellow. If you’re short on time, skip the yellow. Fill each in a frosting bag tied closed with a rubber band or a Ziploc bag.
Snip the corner of the bag or Ziploc about 1/8 inch (not toooooo much, just enough to pipe frosting easily).
Working with one cookie at a time, so that the frosting doesn’t dry too quickly, pipe all four colors swirled around the cookie.
You should cover much of the cookie, but don’t worry about precision. With a toothpick, swirl colors together. Let dry overnight.
TIPS: When piping your colors, go heavier on blue and green, just do a couple dabs of the yellow and white. While precision isn’t important, you should try and at least get the edges of the circle when piping.


Rachel@oneprettything.com says
Wow, they’re gorgeous! I’ll be linking.
Jennifer says
Brilliant, as usual. I still need to show you a pic of some eggs I made after you inspired me.
Chic Cookies says
Thanks Rachel! Look forward to seeing and I’ll be sure to add a link… And thanks Jennifer! Yes, would love to see the eggs! Are they on your site? (I’ll hop over now) or email.
Mary says
Your cooikes look very nice and decorative!
Jennifer says
Such a FABULOUS idea!!!! I love these!!
oneordinaryday says
That is so cool. The cookie pops look wonderful! Great job!!Michellehttps://oneordinaryday.wordpress.com/
Bridget says
Cool idea!
Jamieanne says
These are so pretty and such a great Earth Day treat! 🙂
Robin Sue says
I saw these and wanted to sing “I’ve Got the Whole World in my Hands”! Great cookies, so clever!
Melissa says
What a cool idea! They turned out great!
CCC (Crazy Cooking Camper) says
What a cool idea! Beautiful cookies. I linked your post at PassiFlora magazine (https://passifloramag.com/2009/04/happy-earth-day/)
Hillary says
What a clever cookie idea! I love it! Happy Earth Day!
Julia says
Gorgeous! I love the icing technique!
Chic Cookies says
Thank you everyone! (and thanks for linking)
Amanda says
Gorgeous as usual! 🙂
Sara @ Our Best Bites says
Darling!
Cakebrain says
Man, that’s cool! I wish I could think of something so simply gorgeous and smart!
Mixing Bowl Mama says
These are amazing….I love the icing. Brilliant!
Jenn says
I just want to say that for an Earth Day project, which is supposed to promote recycling and reducing waste, there is an awful lot of waste that is involved in this activity. For one, the stick is not necessary. Also, the plastic bags that are used for the icing, as well as the toothpick necessary for spreading the icing.
This is a very cute snack in the end, however I would prefer an earth day project that does not produce as much waste.
🙂
meaghanmountford says
I remember when I made these years ago,I paused with the same thoughts!! So I think you’re right. Though lollipop sticks are made of paper and are recyclable, the toothpicks can certainly be rinsed and reused, but the plastic bags do get me. I think about the same thing as I use them often. (Although, psst, I also wash them out and reuse them.) You may also substitute washable decorating bags, of course. Thank you for visiting my blog!!