
Some of you may already know this, but every now and then my friend, Cheryl from Sew Can Do, and I like to switch things up a bit and swap posts. Cheryl is all fabric, I’m all sugar. But sometimes we even like to switch that up a bit, too (though I take baby steps into her world, since needle and thread aren’t my friends like they are hers. Seriously, just check out her etsy shop and the crazy cuteness.)
When I spotted these sculptable frosting figures she created, I knew I had to try my own (look for future posts with that experimenting). And these also inspired my casual dabbling with fabric, which I shared with you on Tuesday. Wouldn’t these toppers be so perfect for those cupcakes? So now, I’m handing things over to Cheryl of Sew Can Do!!
SCULPTABLE FROSTING BY CHERYL OF SEW CAN DO
Hey Everybody! It’s Cheryl, from
Sew Can Do, coming to visit the decorated cookie with a new tutorial I’ve created:
Sculptable Frosting.
With this frosting you can cut and sculpt all sorts of fun shapes and designs, like those made with modeling chocolate or fondant, but with all the flavor and a softer texture of a buttercream frosting. If given a few hours to firm up, sculpted shapes will hold up well and can be stored a few days in an airtight container. Yummy right? Here’s how to make some:
You’ll Need:
1/2 cup unsalted butter, softened to room temperature
1 tablespoon heavy cream
1/4 teaspoon real vanilla extract
3-4 cups confectioner’s sugar
Food coloring gels (I use Americolor)
Sculpting Tools – small rolling pin, small paintbrush, nesting circle and flower shape fondant/small cookie cutters, butter knife, waxed paper, standing mixer with paddle attachment
Beat butter & cream in mixer until smooth. Adding a cup at a time, blend in the confectioner’s sugar to create a dough consistency. Add vanilla and beat to combine.
Scoop out frosting to form a mound of “dough” (roughly 1lb):
Separate frosting into portions for various colors desired and, using a single drop of color at a time, knead food coloring gel into frosting until color desired is achieved. If frosting seems sticky, add a small amount of confectioner’s sugar until smooth.
Dust a sheet of waxed paper with confectioner’s sugar and get ready to start sculpting!
To make my snail & mushroom vignette (great as a cupcake topper), use rolling pin to roll out some green frosting about 1/4 inch thick and use a large circle fondant cutter to make the base:
Next grab a piece of white frosting and roll with hands to make a rounded mushroom stem that is about 3/4 inch wide and 1 1/4 inches tall. Stand up and push down slightly so base is a bit wider than the top:
Roll out the red frosting to 1/4 inch thick with rolling pin and cut a medium sized circle. Carefully place on top of stem and allow gravity to help mold the cap shape.
To make the snail roll a piece of pink frosting with hands to be about 1/2 inch wide and 1 1/4 inches long and flatten:
Pull up 1/3 of the strip and press down on the short side with the end of the paintbrush to create the antennae, smoothing & pinching with fingers to shape as desired.
Roll out some blue with hands until it is 1/4 inch thick and several inches long to make the shell piece.
Coil shell and trim outer end flat with knife:
Place shell on the snail’s back. Add snail & mushroom to base. Remove any excess confectioner’s sugar with paintbrush:
Or how about a mini birthday cake made entirely of frosting? Simply change the color of the base circle to make a “plate”. Take a bit of white frosting and flatten about 3/4 inch thick, and use a small circle fondant cutter to create the cake shape:
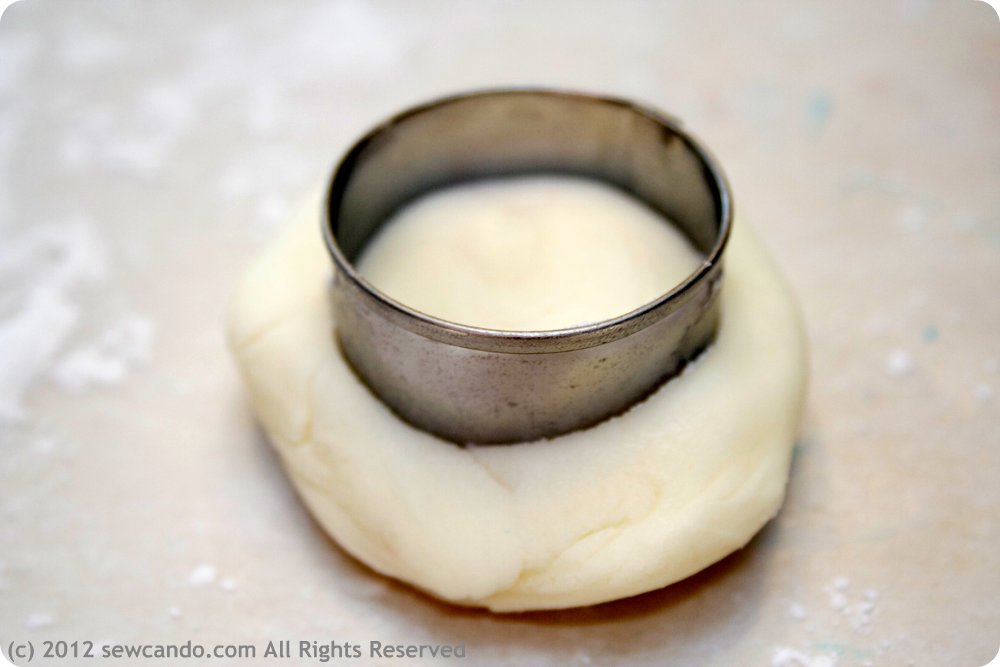
Roll out a bit of pink frosting 1/4 inch thick and cut with a flower cutter and then flatten slightly with the rolling pin to make the shape more uneven and drape over the top of the cake piece to “frost” it.
Add a small piece of white to make a candle and a tiny tapered piece of red for the flame and the cake is complete. Perfect for those kids who only want to eat the frosting off the cake – now they’ll eat the whole thing!
And if you really want to get whimsical, how about a little garden gnome?
Roll out pink, white and red frosting to 1/4 inch thick. Cut a medium circle and taper slightly with hands on lower half to make a face shape:
Use knife to make a triangle with the red that is slightly wider at the bottom than the pink circle. Use the cutter to round out the bottom to make the hat shape:
Place hat over top of circle and curve to fit. Cut flower from white to create a beard and place over lower half of face:
Use end of paintbrush to make eye holes and then fill with small dots or blue. Create a mouth with paintbrush in same way and fill with a small strip of red for a nice smile.
Add a pink circle nose and a strip of pink with a pointed end to either side to create ears and place over a large circle of green under the beard for the gnome’s body and this little guy will be nice and sweet:
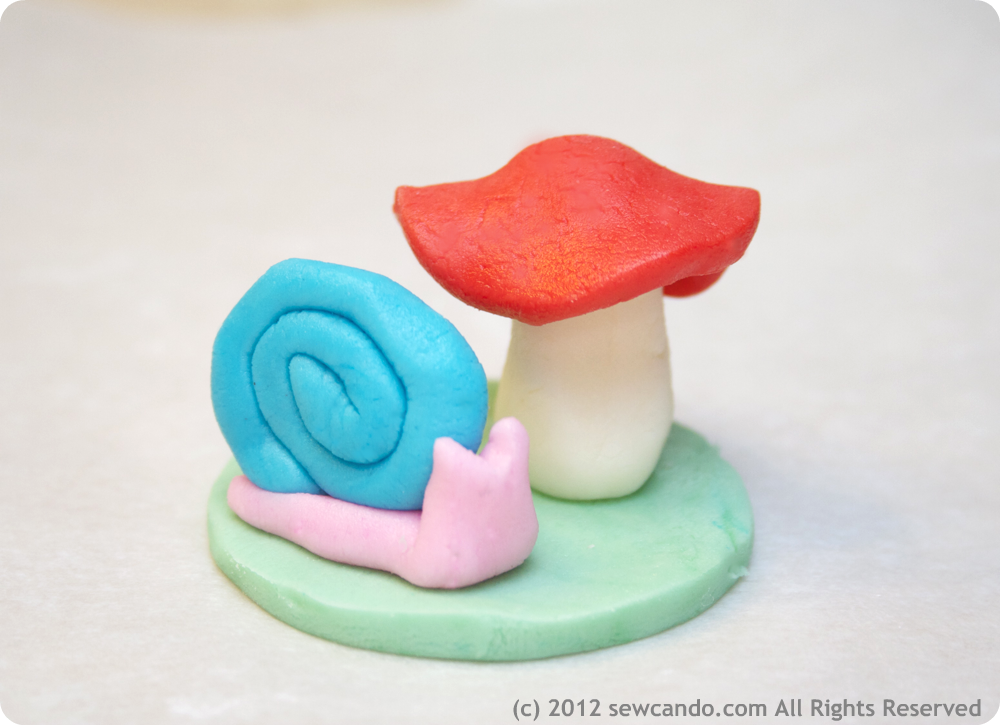
Add creations to decorate cakes, cupcakes, brownies or use as stand alone sweets. The possibilities are endless and incredibly tasty. Hope you enjoy them! Thanks for letting me stop by Meaghan!


Thanks for visiting, Cheryl! And a REMINDER to ALL: This is a guest post by Cheryl of Sew Can Do. I did not create this super cool sculptable frosting. Rather than leave your questions in the comments here, your best bet to get any questions answered is to visit Cheryl at Sew Can Do.
Feel free to share (nicely)! While my blog's photographs and text are protected by copyright, I do allow (and encourage) you to share ONE photograph with credit to "the decorated cookie" and link to this blog post. PLEASE don't reprint any part of the blog post and PLEASE don't post a photo without credit. Thank you!
52 Comments
No way! I’ve been using marshmallow fondant instead of the other yucky kind, but this is something I need to try!! Love it! Great job!!
Cool. I make something similiar to use as a dam to prevent filling from oozing out the sides, but I never thought of using it to mold shapes.
Ohhhhhh, this is so awesome — what a great alternative to fondant!!!
I agree, I can’t wait to try this and finally be able to have a real fondant alternative!!
I just love your decorations!! So cute!
So super cute. Thanks for sharing ladies. I bet it tastes a lot better too!!!!
I love you! I’m making a Thomas cake for my son this weekend, and have been racking my brain trying to figure out how to get the face right. This is perfect!! Thanks so much!
so fun, and it sounds tastier than fondant by a mile!
Holy moly this is awesomsauce! Sounds like it beats rolled fondant in taste! So nice to meet you Cheryl.
Love this idea..I bet this taste better than fondant!
Hi Cheryl . I love this idea. DO you think it will be firm enough to package in a cellophane bag if I put this sculptable frosting on top of a cookie? Thank you so much!!!
Huh, good question! When I experiment with it, I’ll let it sit out overnight and see if it stiffens well enough. I would guess that it would just enough to gently wrap the cookies, but I wouldn’t handle them roughly or try and stack or ship. She posted this tutorial on her blog, too: http://www.sewcando.com/2012/05/sculptable-frosting-fun-sweet-treat-how.html I bet you could comment there and she’ll answer!
Your sculpture are so cute and I’m very intrigued with this frosting. Currently I only use homemade marshmallow fondant to I am really looking forward to trying this, especially the taste!
Wow … I learn something new everyday!
Oh boy, a new form of edible decorations! They are all so cute!
This looks great.
One question – what’s ‘confectioner’s sugar’? Is that the same as icing sugar, the stuff that’s powdered and goes everywhere if you dare to breathe on it?
Yep! “Confectioner’s” sugar here in the US. Also known as icing sugar or powdered sugar or 10x sugar
It this suitable to also cover a whole cake? Does it get crackly when dry? This is intriguing.
Great question! I’ve not tried to make this yet myself, but given my experience with candy clay, I’d say no, it can’t cover a whole cake. That’s a guess though! MY guess is it would be crack if you tried to work on that large a scale.
How many days in advance do you think I could do this? Would I let them sit out or put them in the fridge? I am going to make flowers for mini cupcakes for our tea party.
Thanks!
Hi Kristi, I’m not sure, great question! I’ve never made this myself, but Cheryl should have contact info over at her site. I bet she has the answer!
Wanting to try this for covering a small cake. I’ve used the marshmallow fondant and its so tough to get right and its always cracked or wrinkled on me when I use it. I think this would work as long as it stayed covered until serving so it doesn’t have time to dry out
Can you tell me what heavy cream is, is it fresh double cream ? Or something different
It’s also known as “whipping cream.” I think in the UK it’s one step below double cream, fat-wise.
My sister will love this! She makes all of my nephews cakes herself and hates the taste of fondant.
I am so glad I found this site. (I found it on pinterest) I bake and decorate cakes for all my family members and friends. I never did like the taste of fondant, so I am so excited about trying this recipe! Thanks so much.
This is awesome, definitely gotta try this… Thank you
Does anyone have experience using this on a whole cake? I want the fondant look for my wedding cake, but lets face it – fondant’s not very good!
I agree about the fondant! If you click over to Cheryl’s site and contact her, I’m sure she can give you better info, but I’d say this would likely not be good for covering a whole cake. I’m not sure you’ll be able to roll out a large enough piece or have the elasticity. For all of fondant’s taste flaws, dang, it’s so good for smooth surfaces!
Love your tutorial and have to try this out but would love to know how long this will last due to all dairy products. Thanks
Hi Jodina! Good question. I’m not sure myself… this was a guest post from Cheryl of Sew Can Do, but if you follow the link to her site, there is contact info on her blog. She’s super nice, and I’m sure would be able to answer your question! Thanks for visiting!
How long is this icing good for and what’s the proper handling of this icing as in can you leave at room temp or freeze or does it stay refrigerated. I love this recipe and can’t wait to try it. Thank you.
Is this good on small cakes, and
does it taste good?
Here is how I used your recipe. Thanks!
http://www.anorganizedfamily.com/2013/01/transformers-birthday-party.html#
Hi Jeanette! This was a guest post by Cheryl at Sew Can Do. I’ve never made it or tried it myself, though it has gotten rave reviews. If you click on the link to her site, I’m sure she’d be able to help you!
Thanks, meaghan
So so awesome Amanda! And whatta cutie. I have a 5-year old girl… very fun age, they say the darnedest things!
I’m so excited about this! My son and daughter are turning 5 and 4 next month, and they are having a joint Lego party – this will be perfect to make their cakes! Thank you!
Can you cover a cake with this?
Hi Carolyn, This was a guest post by Cheryl of Sew Can Do. If you click the link to her site, I bet she can answer all your questions. I don’t think you can actually cover a cake with it, but she would know more!
can i use this for covering a cake?
Moly, probably not, but I’ve never tried this. This is a guest post by Cheryl of Sew Can Do. If you click the link to her site you can ask her directly. Thanks!
Wow, this is amazing. I wish I knew about this sooner!
Hello! I was wondering if you are able to use just regular food coloring instead of americolors to change the color of it. Or will it ruin the concentration?
Hi Mayaluna, this was a guest post by Cheryl of Sew Can Do, so I’m not sure, I’ve not tried it myself. But if you visit her blog, I’m sure she can help you. Thanks!
Has anyone triedto freeze this? I want to make my designs ahead of time, (incase I mess up!) so I’m just wondering how long I would have and if I could just pop them in the freezer? Thanks!!
For the marshmallow fondant spray with water to keep it from cracking. Also It might be too dry if its cracking. Maybe use more crisco when you are rolling it out.
Thank you so much for the Fondant . Happy Dance
I tried this and it tasted very good. Much better than fondant and it would sculpt great but I could not get it to spread to put over a cake. Great for sculpting and taste great.
Love these ideas, and for children’s parties, they are wonderful!
I’m using this on my nephews birch bark wedding cakes. I’ve experimented so far placing the the sculpable icing directly onto Butter Cream icing, it worked great! Sculpted and then hand painted the bark curls with Wilton icing color.
Oh good, thanks so much for the feedback, Tama!
I’m planning on using this to help decorate for my son’s minecraft birthday party…I’l let you all know how it turns out!