smiley face cookies
While I usually make my brother birthday cookies of the cartoon characters he most loves at the moment (this is his 38th birthday, by the way), I decided this time to stick with the classics. We’ve been making smiley face cookies on a stick for a decade. (The “we” here refers to the shop where I worked for nearly a decade, Bundles of Cookies. I still say “we” though I left to have my daughter over a year ago, because I was such an integral part of the shop for so long. Sigh. Will always be “we” to me.) Hundreds, nay, thousands of designs we’ve done, but the classic smiley-on-a-stick’s popularity has endured all these years. The instructions here are rather different than those we make at the store. And as always, the stick is optional, but it’s this lollipop phase I’m in.
how to make a smiley face cookies on a stick
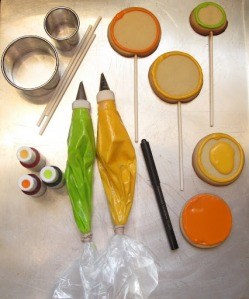
you will need:
cut-out cookie dough
royal icing
circle cookie cutters (I used 2 1/2″ and 1 1/2″)
lollipop sticks (optional)
Americolor soft gel pastes (any, I used Egg Yellow, Electric Green, Orange)
Americolor black gourmet writer
parchment paper
1 frosting bag, coupler and rubber band for each color
1 size “4” tip for each color
small spoon or squeeze bottle
small knife or spatula
*Find the cutters, sticks, parchment, bags, couplers, and tips at any major craft store. You will also find colors and writers at craft stores, but I just love Americolor best. Americolor products are available online or at many specialty cake decorating stores. For tips on finding cookie decorating supplies, click here.
step one: bake your cookies
Roll your dough pretty thick to accommodate the sticks (about 1/4″). Cut out your circles and lay on a parchment paper-lined baking tray. Insert sticks about half way into the cookie. Bake according to the recipe and let cool.
step two: frost your cookies
Tint a cup (or more if you make a lot of cookies) of frosting to the desired shade. Prepare a frosting bag with size 4 tip. Fill with about 1/2 cup of the frosting and close tightly with a rubber band. Pipe an outline on the circle cookies. Let set about 20 minutes. Thin the rest of the frosting until syrupy, with 1/4 tsp. water at a time. Using a spoon or squeeze bottle, pour frosting into center of cookie and spread carefully to edges with a small spatula or knife. Let set well, at least 2 hours, more if possible.
step three: draw your faces
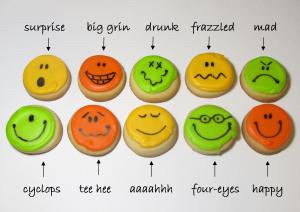
With your gourmet writer, gently draw the face.


Selba says
So cute!!! and with all those faces :)Like the colors too!
pam says
These are so adorable. I never decorate cookies ’cause I can’t bring myself to ever eat them. But I’m awfully tempted – those wonderful faces make me smile and would be a blast to play with.
melissa says
These are wonderful, I am jealous of your talent! I would love to make these, the problem is I am now an empty nester and would eat them all myself!
Chic Cookies says
Thanks Selba!Pam, my customers always had the same problem! (My friend’s dad has 10 year old cookies in his china cabinet. Seriously.)Thanks Melissa! I think eating them all by yourself is perfectly justified.
Netts Nook says
Thanks for sharing all of your great ideas.
Mallory Elise says
ooooooooooooh i want to make skype faces! my favorite is 😛 i’ve been to this cookie site before (quite a few times actually) and remembered ahh yes you are the Renoir with icing-bag instead of brish :)wow thank you for the compliment on my cake (and philosophy~hehe) its an honor to be posted! especially by a real pastry artist, thank you. and i know its confusing that i call it perfectly lousy, but its because its about the person i made it for, i tease him by calling him perfectly lousy. ergo the cake 🙂
Amanda says
I love these too! Everything on your blog is so great! 🙂 🙂